Tuesday, November 18, 2014

Cold Snap Chix

It got down to around 12 degrees last night...the coldest so far this season.  I took the chickens' water in last night to avoid freezing, and when I brought it out this morning, I set to work installing the cookie tin water heater I made.  The internet can tell you how to build this thing.  This is it's maiden voyage, and another 12 degree night is due tonight so we shall see how it works.  I used a bigger tin than suggested, so I might need to switch from a 40 w to 60 w bulb.  Guess I'll find out.

Covered area outside the coop with homemade water heater
cookie tin water heater with heavy duty outdoor extension cord
The heavy duty outdoor extension cord runs to a thermacube, a temperature control device that turns on when the temperature hits 35 degrees, just so the sucker is not running when not needed.  Does combining electricity and water make you nervous?  Me too.  I used electrical tape to cover connection where cord runs into tin just in case any water gets spilled or the hoop cover gets ripped off and the whole thing gets rained on.  Should be alright in a covered setting, though.  And chickens need lots of water in winter, so I am happy to have something that should keep it frost free.

40 w bulb heats the tin
hot mash!  getting warm with a carb-filled breakfast.
coop temp stayed 3 degrees above outside temp
winter chickens in fall

Sunday, November 16, 2014

Pallet Compost Bin

We built this 3 bay pallet compost pallet bin a year ago.  We used the far right bin to compost in for a year.  The middle bin is for storing higher carbon organic matter til needed (straw, leaves, weeds).  The far right bin now has a year's worth of compost in it, and we will leave it to age while we add to the far left bin.

Our 3 bay compost bin system

Lid only added when heavy rains are raining.  Compost needs a lot of water, so normally keep it uncovered.


Burlap keeps the contents of each bin in but allows airflow
A "sponge" of airy organic matter at the bottom of the compost prevents any leaching
Middle bin is "browns" storage:  leaves, leaf mulch, straw or weeds to add to the piles
compost!

Thursday, November 13, 2014

Chicken Challenges: Keeping the Coop Fresh, The Ground Covered, and The Workload Light

What I love about keeping animals and gardening is experimentation.  I find it fun to read about what other people have done, mull it over, and decide what approach I might take, and then do it all over again depending on if things go well.

Keeping chickens has afforded plenty of room for experimentation in the past 2 years.  Areas that are easy to experiment with:

1) How to give chickens access to clean, plentiful, unfrozen, poop-free water with minimal work.

2) How to keep chickens eating lots of greens and bugs all year round.

3) How to keep the coop smelling fresh and lovely.

 4) How to keep the run and free range areas covered with vegetation, compost, or bedding (except the areas where they like to dust bathe, which should be bare soil, or a box with dusty materials in it) to keep their environment healthy and erosion free, with no leaching of manure.

  #1 and #2 deserve their own posts, but I'll talk about #3 and #4 here.  I have tried several things in terms of "bedding in the coop"...item #3 on the list.  Bedding serves several purposes:  absorb moisture and cover poops that the chickens let drop while roosting at night, padding for when they jump down from the roosts, insulating the floor in the winter, and providing heat via composting if you are using deep bedding.  This deep bedding idea is what really seemed interesting to me.

The Garden Dreams Coop.  Pop Door and roof vent stays open all winter for ventilation   Heated waterer turns on if temp hits 35 degrees and keeps water just above freezing.

The coop at Garden Dreams has a wooden floor, and the bedding method I use for that coop is a bit of shavings on the floor, throwing some fresh shavings over the poop on the floor every few days, then shoveling the whole thing out once a month and adding those poopy shavings to the compost pile.  This works pretty well.  The coop stays relatively good-smelling with minimum ammonia odor (which can damage birds sensitive respiratory systems and eyes) and a not-to-terrible maintenance schedule.  However, I think there is room for improvement.

Once a month clean out of Garden Dreams coop
I wear a dust mask when sweeping out the shavings and manure
At home, our coop has a soil floor and my intention was to try out deep bedding.  I used leaf mulch we had on hand over the summer, and about 2 weeks ago, I added 5 leaf bags full of fallen leaves to the mix.  This was a lot of organic matter.  I mixed it up with the old poop/leaf mulch mixture that was there previously, and within a week, the mixture was warm to the touch.  I need to put a thermometer in the coop to see if it is changing the ambient air temperature.  This coop has more ventilation that the coop at Garden Dreams...the whole roof is open hardware cloth with fiberglass panels suspended above.  Since May, it has had a sweet smell and not a whiff of ammonia, although I have not removed any droppings.  I plan a once a year cleanout for this coop, likely in spring.

Home Coop

Home coop leaf bedding added
In terms of  "keeping the ground covered",  I mean the run, paths, and free range areas intact and covered with vegetation or organic matter - this is a big issue in our home setup, since we are on a hill.  The chickens scratched their run bare of grass, leaving it open to erosion.  In past posts, I wrote about renovating our defaced chicken run.  That process is working well.  We are going with the phrase..."Leave No Naked Soil!"  The wood plank terraces we built are getting filled in with free wood chips and leaves over cardboard, grass clippings, pine needles...whatever is around.  The winter rye is starting to fill in and the soil raked all to hell by chicken claws is covered and protected by leaves and other organic matter.

Home Coop with bare soil covered
Before soil renovation
Starting renovation
Organic matter starting to fill in terraces.  Look at that automatic pop door...fancy!

Organic matter filling in the paths

All in all, I can't wait to see how this setup holds up when we move the chickens back over to the renovated area next year.  The idea is to leave them in there til they are just starting to beat up the land, and then move them to their second run area so the first can recover and regrow.  More experiments to come, I'm sure!


Wednesday, November 12, 2014

Moldy Gourds: Curing Speckled Swan Gourds

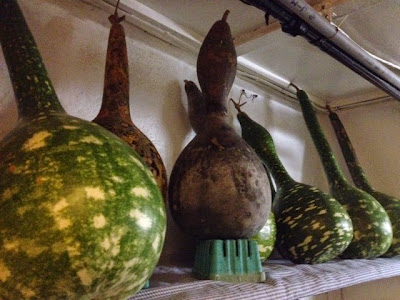
Did you know that gourds often mold as they cure?  I didn't.  As the shell dries, mold may form.  As long as there are no soft spots, it's all good.  We grew Speckled Swan Gourd (Lagenaria siceraria) this year.  These gourds take a long time to mature but they are very easy to grow, and very vigorous!  They have pretty white flowers as well.  They really pulled on our fence while they were growing because we had so many maturing.  They are not damaged by cold as easily as other gourds. 

Before the first hard frost and after the vines had died back, we harvested these babies.  I left at least 2" of stem on each.  I left them on our picnic table since the weather was still good for about 2 weeks.  The sun helped their skins harden.  Then I took them into the basement, wiped them with vinegar and set them near the boiler to dry.  Now that they are starting to get their mold on, I will likely move them somewhere we don't frequent.  I've read they can give off quite an odor when curing, though they smell fine now.  Where will they go?  Not sure yet...somewhere well ventilated that doesn't freeze much is best.  If most of them cure alright, I have a lot of birdhouse making ahead of me! 

Mold forming on the drying gourds is normal and can contribute to patterns on the finished dried gourd
Speckled Swan Gourds curing in the basement
Add caption

More gourd info...

Monday, November 10, 2014

What's Happening In The Garden This Week

We got a break from the chilly weather with a gorgeous day in the 60s today.  After a walk with Ida the Dog in Frick Park, I was gardening til the sun set just now.  Most things are mulched and tucked in for winter, except the greens that are still growing under cover.

Stayman Winesap apple tree in foreground and 2 beds covered with hoops and row cover for fall and winter harvests.
I have picked up a nugget or two of wisdom from all the expert gardeners I have read about.  One of those is keep your soil covered!  Winter winds and rains erode and compact soil, and the sheet mulch beds that we made this spring are indeed covered.  2 beds got seeded with winter rye, which grows in the fall, overwinters, and then grows in the spring.  We will mow it down and fork it in, or let the chickens finish killing it 1 month before summer planting.  Planting in a rye bed sooner than that is asking for poor germination, as the plant puts out chemicals that inhibit germination.

Winter rye in some of the beds

Soil that isn't covered with rye is mulched with straw or dead plant material.  I like the way the straw makes the beds look.  It tidies everything up a bit.  

An old mailbox becomes a garden toolbox for trowels and gloves
This horehound and Aronia (below) are part of a mixed planting of shrubs, trees, herbs, and berries that I would like to become a screen of sorts from the road and neighbor's house.  Its about a 4' wide swath of plantings along our front and side fencelines, and I have a mix of all kinds of things going on.  I have my culinary herbs in a border of sorts closest to the house: oregano, marjoram, thyme.  I have Aronia (a berry shrub rich in antioxidants), Nanking Cherry (These are doing terribly and will need a boost of compost, worm castings, and rock fertilizer in spring), Serviceberry, Paw Paw (the site is too sunny for these trees ideally but they are an experiment here.  I also have them planted in a different spot with dappled sun that they should prefer), comfrey, borage, fig, 3 apple trees (Stayman Winesap, Zestar, Arkansas Black), hazelnuts, and flowers.  It has been great fun to see these things grow this season.  All have been slow, but I think next year, we will see some real growth!

Horehound, a medicinal herb (left) and Aronia, a berry shrub (right)
2 of the 4 hazelnuts I planted are still kicking.
I've read hazelnuts yield the most when grown as a single stem form.  Since part of the job of these plants is to form a "hedgerow screen", I plan to let them just grow wild, no pruning required.

My gaudy New England Aster is still blooming and the bees love it.  Aster actually produces more bee food after frosts hit.
A young buck made it into our yard a few days ago.  We hung up some streamers from the fence to discourage him from jumping in again, although he was so freaked out by being in the yard, he didn't eat anything and promptly jumped out again.  This is the time of year we expect them to make their moves in, so we will just have to see how it goes.  I plan on planting some diversion plants on the outside of our fence in the back.  As far as other munchers, I know we have a lot of voles around here because I see them running around.  The chickens catch some of them, but I protected my apple tree trunks from the ones that the chickens can't get to.

Rodent Guard around apple tree trunk.  Rodents love to chew tender bark.
I rarely sit and relax in the garden.  It doesn't feel quite private enough for that yet.  But I do sometimes sit on this little bench I found.

My little garden bench, found on garbage night in Edgewood.
Asparagus ferns starting to die back
I love this Sweet Bay Magnolia, grown by our friend Nick and purchased from Tree Pittsburgh.  Now, it has a fancy belgian block ring round it!
Lil kitchen herb garden by the back door

Raspberries

Thursday, November 6, 2014

Winter-Ready Chickens

As winter draws close, the first section on my homestead to-do list looks a bit like this

1) Add bedding to chicken coop
2) Finish building up terraced paths to chicken coop with cardboard and wood chips
3) Make some sort of outdoor covered space in the chicken run area

I am sensing a theme here....bawk!
So, how do chickens do in the winter?  Quite well, really!  Our chicken coop itself is meant to ventilate, not insulate.  The structure will not "hold heat"....it's really only a hardware cloth wrapped frame with a tarp tied (fairly tidily) around it.  The hens stay warm by huddling on the roosts at night and the tarp keeps the howling wind off them.  Folks have different theories with how warm the birds need to be, but my theory on getting chickens through winter (borrowed from lots of other people's experience and one very cold winter of experience)....

1) Raise the right chicken for your climate.  Heavy breeds like New Hampshire, Australorp, and Barred/White/or Partridge Rock do well in cold climates.  Their body weight and thick feather growth keep them warmer.  Easter Eggers and Dominiques are slightly smaller, lighter breeds but they do great in my flocks as well.  Small combs are great, because they don't risk frostbite as much.  Pea combs are the smallest.  Rose combs and small single combs are good too.

2) Raise enough birds.  First of all, chickens need a flock.  A single chicken is a lonely chicken.  But also, they need a flock to roost with because that's how they stay warm on those cold cold nights.  City flocks usually need to be small because of space or legalities, but the more the merrier as far as warmth goes.

3) Don't use heat lamps, unless you are in the very far north.  Heat lamps prevent chickens from feathering out into their thickest winter coat.  Also, heat lamps can fail, leaving chickens shivering and prone to frostbite since they are not properly acclimated to the cold and are not properly feathered out.  Here in Zone 6 with an unusually cold winter last year there was no frostbite on my birds.  Also, you don't have to worry about running up your electricity bill or burning down your coop if you forgo the heat lamp.

4)  Provide ventilation.  The moisture in the coop has to get out.  Otherwise, the birds will get frostbit on their combs when the weather gets very cold.  In sub zero weather with a pop door open and a roof vent on the coop (vent hole at top and bottom of coop to draw out moist air) our chickens did quite well, while I knew of friends whose heated, closed-up-tight coops caused their birds to get frostbite.  This is because it is quite difficult to truly raise the temperature of an entire coop above freezing in very cold weather, and no ventilation means lots of moisture and therefore likeliness of frostbite even at just below freezing temperatures.  However, ventilation does not mean drafts directly on the birds.  Make sure no wind will be blowing on them at night.

This inspiring read by Prince T Woods from 1924 and reprinted by Norton Creek Press sings the praises of winter ventilation for poultry
5) Throw down a high carb scratch if you are around your birds in late afternoon.  If a really cold night is coming, throw down some cracked corn and whole grains for them.  This extra boost before bed will help them stay toasty.

6) Keep the water coming.  Chickens need lots of fresh water in winter to regulate their body temperatures.  Either use an element to keep the water from freezing or change it often!  I like this homemade, cheap water heater....http://www.the-chicken-chick.com/2011/11/make-cookie-tin-waterer-heater-under-10.html  Don't let water spill in the coop and keep the bedding as dry as possible.

This is what works for me, every flock-keeper has her own way.  I know I have much more to learn, but that is the fun part!

The chickens don't mind the cold...but I know they like to be outside most days, with some cover from the elements, and keeping their coop fresh in winter is a must...for their health and to keep their eggs clean.  So, I'm still working on outdoor covered space, but the easy part was some fresh bedding material.

Our coop lets the moisture from the chickens' breath out and it has been very easy to keep completely odor-free all year.  Over a dirt floor I have added leaf mulch, and recently, a big batch of fall leaves (check off number one on my list!)  But what about predators digging in since the floor is dirt?  Good question!  The electric fence usually prevents this, but it is off for the winter.  We have buried a 2' "apron" of 1/2" galvanized hardware cloth all the way around the coop to foil any digging.  

New Hampshire Red checking out the "leaf litter" bedding
As far as the new bedding, the chickens seem to like their springy "leaf pile" bedding and covering any poops below the roosts every few days is as simple as stirring up the leaves for about 30 seconds with a garden fork.  Since the coop is towards the bottom of a hill, I knew I needed to minimize cleaning it out, since hauling poopy bedding up the hill to compost is anticipated to be a royal pain in the ass.  With this modified "deep bedding" sorta thing, it seems a once a year clean out should be perfect.  So, bedding is done, covered outdoor area, and path-building to the coop still on the "to-do"!

Leaf pile frolic

Monday, November 3, 2014

Chicken Run Renovation in Progress

We diverted the chickens to another area of grass for a run over a month ago so we could repair the damage they had done to the slope they had been on.  We created some rag tag terraces with sunflower stalks and logs, heaped plant material on the uphill sides of those and designated that area as "compost and soil building area" (the center of the photo below).  Uphill from that, I seeded winter rye, and plan to reseed in winter/early spring with other forage crops that chickens might like better than rye.  The rye experienced a tad of washout as expected but still germinated fairly evenly.  Looking forward to future experimentation with this space.

Chicken run renovation in progress

The flock getting ready for bed